
![]()
Force Plate Swings
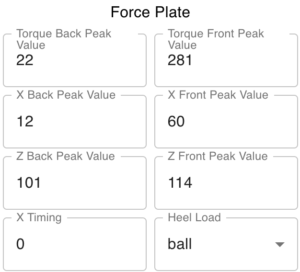
Dylan’s load in the rear foot is seen as a ball of foot pressure load. This will make holding a hinge and getting a good rear glute load difficult. We would like to see a whole foot load to a slightly heel centric heel load. This will also allow for more adjustability in the advance as a ball of foot load generally leads to early back leg extension. This is seen in his x-axis timing which was minimal, meaning the time between his horizontal movement forward and him stopping his horizontal movement in the lead side took longer than ideal. Overall torque numbers were good, but vertical force numbers were low. These can be improved in the weight room through single leg work, medicine ball throws, and PVC check swing work.
KVEST Sequencing & Rotational Speeds
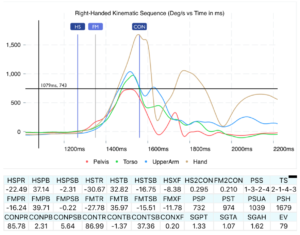
Dylan presents as a 1-3-2-4 swing pattern (pelvis, upper arm, torso, hand). This is not an uncommon swing pattern, but is out of sequence none the less. Deceleration of the pelvis can be improved to increase speed transfer and shorten time between segments. The pelvis has adequate speed and the gains between pelvis and torso are within range. There is a minimal gain between torso and upper arm. By looking at the graph we can see that the arm is starting early, suggesting lack of scapular load (resistance) from the torso. Increased resistance in the advance will lead to increased bat speed potential and allow for better adjustability to off speed. Torso positions and posture hold throughout the swing.
Bat Sensor Data
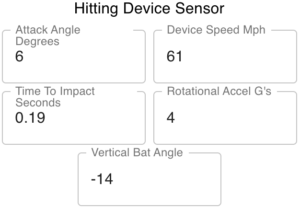
Dylan’s bat speed was 59-61 mph. This will be improved with better scapular resistance. Rotational acceleration and time to impact are low. The 4 G’s of rotational acceleration show some length in the turn away from the body. This shows in the time to impact at .19 seconds. The overall time to impact is also affected by his ball strike out farther in front of home plate (this is most likely a good thing for him as it allows him to get back on plane after a steeper decent into the zone. His attack angle was 6 degrees on this swing which is slightly lower than ball pitch plane (8-12 degrees), but overall attack angles were relatively within ideal parameters. Vertical bat angle was slightly lower on this particular swing but was good overall in his grouping of swings.
Swing Prep
- PVC full swing (hear the most amount of wind off the PVC)
- PVC 180 degree swing – use a split grip on PVC (about two fist lengths). Create as much wind as possible while not going past 180 degrees of a turn. There will be rear elbow disconnect from the body line, but not across the belly button. Repeat from different postures (different pitch heights). Repeat to different layouts (opposite field, center, pull side).
- PVC 90 degree swing – use a split grip on the PVC (about two fist lengths). Create as much wind as possible without disconnecting rear elbow from rear hip. Repeat from different postures (different pitch heights). Repeat to different layouts (opposite field, center, pull side).
- Full bat swings (fastest bat speed)
- Bat 180 degrees swings on a tee – use split grip (about one fist length). Create as much much speed as possible without going past 180 degrees of a turn. There should be no wrist roll on the finish. There will be rear elbow disconnect from the rear hip (but not across belly button). Repeat from different postures (different pitch heights). Repeat to different layouts (opposite field, center, pull side).
- Bat 90 degree swings on a tee – use split grip (about one fist length). Create as much speed as possible without disconnecting rear elbow from rear hip. Repeat from different postures (different pitch heights). Repeat to different layouts (opposite field, center, pull side).
- Bat 180 degree swing on a flip or short overhand – use split grip (about one fist length). Create as much much speed as possible without going past 180 degrees of a turn. There should be no wrist roll on the finish. There will be rear elbow disconnect from the rear hip (but not across belly button). Repeat from different postures (different pitch heights). Repeat to different layouts (opposite field, center, pull side).
- Bat 90 degree swing on a flip or short overhand – use split grip (about one fist length). Create as much speed as possible without disconnecting rear elbow from rear hip. Repeat from different postures (different pitch heights). Repeat to different layouts (opposite field, center, pull side).
- Rotational medicine ball throws – start in stance with medicine ball around rear ribcage/abdomen. Stride and throw medicine ball with focus on staying in posture. Repeat from multiple hitting postures (different pitch heights) and different directionality (opposite field, center, pull side).
- Cross body medicine ball throws – start in a cross body stance (lead leg stride across the direction of the throw). Full speed throw trying to maintain feet spacing. Repeat to different postures (pitch heights) and directionality (opposite field, center, pull side)
- Rotational medicine ball throws with constraint – start in stance with medicine ball around the rear ribcage/abdomen. Stride and throw medicine ball with focus on staying in posture. Block lead leg from opening while thinking lead pocket should turn as little as possible. Repeat from multiple hitting postures (different pitch heights) and different directionality (opposite field, center, pull side).
- Cross stride start full swing – start with rear foot two feet behind front foot in normal launch position. No additional stride, slight counter turn and then swing. Try to maintain spacing between feet. Repeat to different postures (pitch heights) and directionality (opposite field, center, pull side).
- Normal stance cross stride full swing – start in normal stance, stride closed (about two feet). Full swing trying to maintain feet spacing. Repeat to different postures (pitch heights) and directionality (opposite field, center, pull side).
- No feet neutral stance full swing – start in neutral launch position. No additional stride, slight counter turn and then swing. Feet stay anchored throughout the swing (back foot may slide rearward but stay flat on ground). Repeat to different postures (pitch heights) and directionality (opposite field, center, pull side).
- Normal stance/stride no feet full swing – start in normal stance and take normal stride. Go right into swing without the feet coming off the ground (back foot may slide rearward, but stays on the ground). Repeat to different postures (pitch heights) and directionality (opposite field, center, pull side).
- Full swing limited hip turn – normal stance and stride. Normal swing trying to have the least amount of hip turn to get to full speed and best ball strike. Repeat to different postures (pitch heights) and directionality (opposite field, center, pull side).
- Full swing limited torso turn – normal stance and stride. Normal swing trying to have the least amount of torso turn needed to get to full speed and best ball strike. Repeat to different postures (pitch heights) and directionality (opposite field, center, pull side).
- Banded resistance swings – banded resistance to the lead hip (belt). Normal swings with thought of resisting the band from pulling you forward in the turn. Band resistance can be altered as necessary. Repeat to different postures (pitch heights) and directionality (opposite field, center, pull side).
- One leg kettlebell squat w/slide disc – start on back foot with kettle bell front racked. Front foot will have a slide disc under it. Squat with normal pattern with emphasis on feeling heel centric load, while allowing lead foot to slide out.
- One leg kettlebell jump squat – start on back foot with kettle bell front racked. Squat with normal pattern and then jump off the ground. Stabilize with a soft landing as you go back into squatting position. Feel the heel impact and create pressure against the ground.
- Back foot disc anchors – start with a disc under the ball of the foot of the rear shoe. Heel of the rear shoe should be anchored to the ground. Stride away from the back foot while keeping it anchored in the ground.
- Both feet disc anchors – start with both balls of feet on the slide disc. The heel of both feet should be off the discs. Stride forward by sliding the lead slide disc forward (you should be on the ball of foot only. The rear shoe will stay anchored in the heel and the lead side will slide free. As you get to end of stride length begin to turn the pelvis/hips. The lead foot should now anchor the heel which will stop the slide forward. Back side will likely spin or kickback off of disc.
- No feet neutral stance full swing – start in neutral launch position. No additional stride, slight counter turn and then swing. Feet stay anchored throughout the swing (back foot may slide rearward but stay flat on ground). Repeat to different postures (pitch heights) and directionality (opposite field, center, pull side).
- Normal stance/stride no feet full swing – start in normal stance and take normal stride. Go right into swing without the feet coming off the ground (back foot may slide rearward, but stays on the ground). Repeat to different postures (pitch heights) and directionality (opposite field, center, pull side).
- Banded resistance swings – banded resistance to the lead hip (belt). Normal swings with thought of resisting the band from pulling you forward in the turn. Band resistance can be altered as necessary. Repeat to different postures (pitch heights) and directionality (opposite field, center, pull side).
 PRIVATE LESSONS
 CLASSES
 CAMPS
CAMPS ELITE TEAMS
 ELITE BASEBALL TV
 VIDEO ANALYSIS
 BIOTECH CAGE
 SHOWCASE