
![]()
Mobility Screen
Gunnar sets up in an “s” posture in his athletic stance. In his pelvic tilt screen, he was limited in both anterior and posterior tilt as he showed vibration. This suggests there is an imbalance in his lower abdominals. Once improved, this will likely allow Gunnar to maintain his posture throughout his swing. Gunnar was limited in both disassociation screens. What this means is, he has a difficult time separating body segments. Separation between lower and upper body is crucial for optimal stretch. Gunnar was limited in the overhead squat, however, he passed the secondary test.
Gunnar was “hyper-mobile” in his thoracic rotation screen as he showed 75 degrees of thoracic rotation his right and 85 degrees on his left. What this means is, it’s going to take a longer time for him to remove the slack in the middle of his body. This will likely tighten up once he gains strength. His thoracic side Gunnar was 45 degrees in both directions. This shows he is able to have proper side bend at contact. He was limited in his scapular palpation screen as we were able to get 4 fingers underneath his shoulder blades. In order to create resistance in his swing, Gunnar will need to strengthen his scaps. His scapular retraction was around 4 inches on each side.
Gunnar was considered neutral on the lower quarter rotation screen. He had 50 degrees on internal hip rotation on both sides. He had 45 degrees on external hip rotation on both sides. In his glute bridge screen, he showed core instability. Gunnar passed all shoulder, wrist, and cervical screens.
Force Plate Swings
Gunnar produced 100% BW into the ground and loaded into ball of toes. Ideally we want to see a heel or whole foot load. Loading into the ball of foot makes it difficult to remain anchored (staying back) as he goes into his forward advance. His front leg vertical force metric is at 140% BW. His Vertical force is lower than expectation and we would prefer him to generate the speed faster. Once he learns to create a violent interaction with the ground, he will produce more output.
KVEST Sequencing & Rotational Speeds
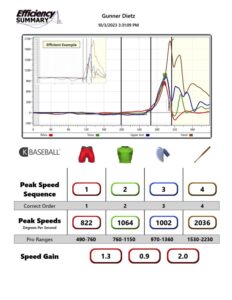
Gunnar demonstrated an “in sequence” swing pattern. What this means is his body rotated in the preferred order (hip, torso, upper arm and bat). However, an area of focus will be separation between body segments. This circles back to the disassociation screen, in which Gunnar was limited. You can see in the graph, all of his body segments are peaking at the same time. This will force Gunnar to spin off the ball and make an early swing decision. Once corrected, he will be able to see the ball longer and delay swing decision. Once this is corrected, he will be able to “stay back” and produce more output. Hip speeds are at expectation near 822 deg/sec. Torso speed gains at 1064deg/sec. The lead arm turns nearly the same at 1002eg/sec and his hand speed meets expectation at 2036deg/sec.
Bat Sensor Data
Gunnar’s bat speeds were below average for his age, ranging from 52-56mph. His attack angles ranged from 13 to 20 degrees, which is slightly higher than expectation. Once he lowers this, he will be on plane longer resulting in more hard contact. His rotational acceleration (tightness of the turn) numbers were below average at around 4G’s. This will likely improve once he gains core strength / stability. His time to contact is below average at 190ms. Vertical bat angles vary based off of pitch location. Gunnar’s was within expectation, ranging from -20 to -40.
Movement Prep
Disassociation
- Plank position with forearms on the ground. Rotate hips while keeping upper body stabile.
- Anchor assisted dissociation – use a wall or door frame to help stabilize your upper body. Rotate hips around pelvis while keeping the upper body stable. (Can have someone hold your shoulders as an anchor as well)
- Partner assisted counter turn pelvic dissociation – have a partner turn your shoulders into counter rotation. Resist the rotation and then rotate pelvis/hips while resisting the counter turn. Repeat from multiple postures.
- Self resisted pelvic disassociation – start with a PVC on the shoulders for reference. Keep the PVC stabile while rotating pelvis/hips. Repeat from multiple postures.
- J-band assisted dissociation – start in your stance with j-bands attached to your wrists (the anchor for the bands should be off your back shoulder to your chest side). Stride out, while keeping or adding resistance to the bands. Land and go into lower body turn without turning upper body.
Pelvic Tilt
- Sit-up position posterior tilt – start in sit-up position with your hand under your lower back. There will be a natural tilt of the pelvis into anterior position. From here begin the sit-up while trying to feel your lumbar spine press firmly into your hand. Once you feel this sensation you will return to original position. Next try to create the Gunnare sensation without raising your shoulders or hips off the ground.
- Hands and knees anterior/posterior tilt – start on hands and knees (knees under hips). Create anterior and posterior tilt using as little thoracic movement as possible.
- Hands and knees single arm anterior/posterior tilt – start on hands and knees (knees under hips) and bring one hand to your chest. Create anterior and posterior tilt using as little thoracic movement as possible. Repeat with the opposite hand on chest.
- Standing hands on knees anterior/posterior tilt – start with hands on knees (athletic position). Create anterior and posterior tilt with as little thoracic movement as possible.
- Standing single arm anterior/posterior tilt – start with one hand on a knee and the other on your chest (athletic position). Create anterior and posterior tilt with as little thoracic movement as possible. Repeat with opposite hand placement.
- Dead bug progression – start on back with knees and hips Beaut at 90 degrees (you should feel your entire spine connected to the ground – if not Beaud slightly more from the hips). Elevate arms so the wrists and elbows are directly above the shoulder (towards the sky). Extend one leg away without the spine coming off the ground (the pelvis will want to go anterior and lift the lumbar spine). Reset and repeat with the other leg.
Scapular Resistance
- J-band reverse fly’s – attach j-bands to both wrists. Start with anchor point facing the chest. Pull arms rearward by retracting the scapulas together. Maintain a neutral spine position. Hold at the retracted position for a 5 count and then return to the front (5 count coming forward as well – as the scapulas slowly move away from the spine and work off the rib cage.
- J-band Beaut arm pulls – attach j-bands to both wrists. Start with anchor point facing chest. Arms start Beaut at 90 degrees. Pull the elbows rearward as you retract the scapulas towards the spine. Maintain a neutral spine position. Return back to 90 degree position. Repeat as you change anchor point height and adjust posture accordingly.
- Single arm j-band arm pull – attach j-band to the back side wrist. Start with anchor point facing chest. Arm starts at 90 degrees. Pull elbow rearward while lead arm stays relaxed. Keep rib cage as stabile as possible. Return back to starting point. Repeat as you change anchor point and adjust posture accordingly.
- Single arm j-band body turn – attach j-band to the back side wrist. Hold arm at 90 degrees. Rotate body in the normal swing direction. Make sure the wrist doesn’t move as the scapula is retracted by the turn of the torso. Return back to starting point. Repeat as you change anchor point and adjust posture accordingly.
5. Single arm, j-band back resisted turn – attach j-band to wrist. Anchor point will be off the side of the body (back shoulder). Start with arm at 90 degrees. Turn torso away from anchor while resisting wrist movement away from body (supination is fine). You may feel external shoulder rotation. Repeat as you change anchor point and adjust posture accordingly.
Swing Prep
Pelvic Centering (Deceleration)
- Rotational Medicine Ball Throws – Start in stance with medicine ball around rear ribcage/abdomen. Stride and throw medicine ball with focus on staying in posture. Repeat from multiple hitting postures (different pitch heights) and different directionality (oppo, center, pull side). Make Sure you maintain hitting posture keeping tilt towards the plate.
- Closed Stride Medicine Ball Throws – Start in a closed cross body stance (lead foot starting closer to the plate than back foot – at least a foot in between). Full speed throw trying to maintain feet spacing. Repeat to different postures (pitch heights).
- Back Foot Slide Disk Med Ball Throws – Start in normal stance with slide disk under rear foot. Throw medicine ball in direction of the pitcher while kicking out slide disk rearward (in the direction of your back) as far as possible.
- No Stride Feet Down Swings (Tee) – Start at post stride and complete a normal swing. Make sure the feet stay completely flat on the ground the entire time. The movement (turn) should come from the center of the body. Repeat to different ball heights and locations.
- Regular Stride Feet Down Swings (Tee) – Start in normal stance and complete a normal swing. Make sure feet stay flat on the ground after the stride. Don’t pause between stride and swing. Repeat to different ball heights and locations.
- No Stride Feet Down Swings (Flip) – Start at post stride and complete a normal swing. Make sure the feet stay completely flat on the ground the entire time. The movement (turn) should come from the center of the body. Repeat to different ball heights and locations.
- Regular Stride Feet Down Swings (Flip) – start in normal stance and complete a normal swing. Make sure feet stay flat on the ground after the stride. Don’t pause between stride and swing. Repeat to different ball heights and locations.
- Normal Stance Closed Stride Full Swing – Start in normal stance, stride closed (at least a foot). Take a full swing trying to maintain feet spacing. Repeat to different postures (pitch heights) and directionality (opposite field, center, pull side).
- Full Swing Limited Torso Turn – Normal stance and stride. Take a swing trying to have the least amount of torso turn needed to get to full speed and best ball strike. Repeat to different postures (pitch heights) and directionality (opposite field, center, pull side).
- Banded resistance swings – banded resistance to the lead hip (belt). Normal swings with thought of resisting the band from pulling you forward in the turn. Band resistance can be altered as necessary. Repeat to different postures (pitch heights) and directionality (opposite field, center, pull side).
- High jumps with rigid acceptance – jump as high as you can. As you’re coming down prepare to land in a squat position and immediately stop. Try to stop all downward momentum as fast as possible. Can change the heights of the jumping surface as needed.
- Broad jumps with rigid acceptance – jump as far forward as you can. As you’re coming down try to land in the same position as your counter move (think bent over and arms behind you). Try to be as rigid as possible.
 PRIVATE LESSONS
 CLASSES
 CAMPS
CAMPS ELITE TEAMS
 ELITE BASEBALL TV
 VIDEO ANALYSIS
 BIOTECH CAGE
 SHOWCASE