
![]()
Mobility Screen
Kai sets up athletically in a slight “S” posture spine position. During his pelvic tilt screen he was limited in his ability to create posterior tilt and showed some vibration in trying to enter posterior tilt. There was no improvement with assistance. This indicates there is lower abdominal control or strength issues. In the pelvic disassociation screen he was able to move his pelvis while keeping his torso stable. He was also able to keep his pelvis stable and move his torso in his torso disassociation screen. Kai was limited in his overhead squat screen and limited in his secondary squat screen. His knees pinch inward and there was hip sway present. In the subsequent ankle dorsiflexion screen he was limited in his right ankle by 1” and in his left ankle by 1.5”.
Kai showed loose mover capabilities in his thoracic rotation screen as he was able to produce 85 degrees active and 90 degrees passive in rotation to the right and 80 degrees active and 90 degrees passive to the left. Thoracic side bend capabilities are also considered loose at 45 degrees tilt to the left and 45 degrees tilt to the right.
Kai showed 4.5” of scapular retraction on both sides. He was limited in the scapular palpation screen as we were able to easily get 4 fingers under both scapulas. His external rotation on the right and left arm were even with his spine. Left internal shoulder rotation was good, right internal rotation was slightly limited. Kai showed limitation in his lat length as he was only able to raise his right arm to just in front of his nose. In his reach, roll, and lift screen he was limited in being able to roll his arm and showed shaking while holding it up.
Kai was good in his single leg balance screen, lasting 15 seconds on both sides. In his glute bridge screen he was able to hold for the full 10 seconds but did show some core instability. When asked what muscles felt activation he signaled hamstrings. His lower quarter rotation screen showed loose internal rotation capabilities with his right leg internally rotating 70 degrees and his left 50 degrees. External rotation capabilities were neutral at 45 degrees on the right and 40 on the left.
Force Plate Swings
Kai produces a spike to 102% in his backside load. This is caused by him getting into his toes during his load. Ideally, we want him to use more of his heel in his load and this will allow him to hold the force created by his backside load longer into the forward advance. His front foot shows a below average rate of force development and low total force output. Kai’s X-Axis timing metric is slightly below the ideal range. He is at 67% and we’d like to get that closer to 80%. This will improve as he adds a heel load. The torque metrics are within expectation for someone with his stride style.
KVEST Sequencing & Rotational Speeds
Example 1:
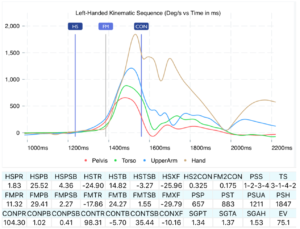
Example 2:

Kai presents in both examples as an in sequence swing (pelvis, torso, lead arm, hand). He showed average acceleration in pelvis and torso, but was limited in pelvis and torso deceleration. He did show decent gains from pelvis to torso, torso to arm, and arm to hand. Entering heel strike the pelvis was positive degrees (open) in each example (1.83 degrees and 2.76 degrees). At that moment the torso was negative degrees (closed) (-24.90 degrees and -8.14 degrees respectively). That is a big variance for disassociation with one being 9.97 degrees of separation and the other being 27.66 degrees). This should be noted as it will affect time to impact and speed creation. In the example where he is -8.14 degrees internally rotated in the torso he ends up being overly rotated at contact (107.44 degrees). This large turn radius explains the slow torso deceleration and the lack of internal shoulder rotation or resistance will force more degrees to get to a perceived full speed swing. In the example with -24.90 degrees of internal torso rotation at heel strike, contact shows 98.31 degrees of torso rotation, which is still slightly greater than expected and shows slow torso deceleration capabilities as well. Overall total torso rotation from heel strike to contact is between 115 and 123 degrees. Pelvic rotation during the same timeframe is 106 degrees. Of note there was an increase in forward torso bend to side torso bend from first move to contact (EX 1: 24 degrees to 35 degrees and EX 2: 17 degrees to 36 degrees). This variance is likely due to pitch location and making accurate postural decisions in the forward advance.
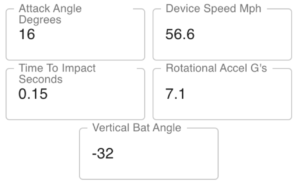
Bat Sensor Data
Example 1:
Example 2:
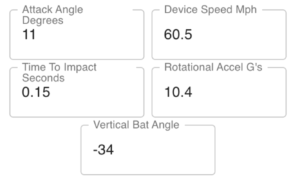
Kai’s bat speed was 56-60 mph. Attack angles were consistent with pitch plane. Time to impact was good, but there was a deficit in rotational acceleration. This means that there is a disconnection in the length of the arc of the arms/hands in the turn. This can be improved with the PVC check progression as detailed in swing prep work. Kai’s vertical bat angles were consistent within normative ranges.
Movement Prep
Hinge/Counter Move
- 2 knee anchored hip hinge – start on two knees. Keep spine in neutral position. Hinge from hips as the hip goes rearward towards heels.
- 1 knee anchored (rear knee) lead leg extended hip hinge – start on rear knee w/lead leg extended sideways. Keep spine in neutral position. Hinge from hips as the hip goes rearward towards heel.
- Banded rear hip 1 knee hip hinge – start on rear knee w/lead leg extended (banded rear hip -belt). Keep spine in neutral position. Hinge from hips as the hip goes rearward towards heel.
- Standing kettlebell half squats – front rack a kettlebell and squat from a neutral spine position.
- Standing kettlebell one leg half squat w/slide disc – front rack a kettle bell and squat on rear leg from a neutral spine position. Front foot should slide away from body to the side.
Pelvic Tilt
- Sit-up position posterior tilt – start in sit-up position with your hand under your lower back. There will be a natural tilt of the pelvis into anterior position. From here begin the sit-up while trying to feel your lumbar spine press firmly into your hand. Once you feel this sensation you will return to original position. Next try to create the same sensation without raising your shoulders or hips off the ground.
- Hands and knees anterior/posterior tilt – start on hands and knees (knees under hips). Create anterior and posterior tilt using as little thoracic movement as possible.
- Hands and knees single arm anterior/posterior tilt – start on hands and knees (knees under hips) and bring one hand to your chest. Create anterior and posterior tilt using as little thoracic movement as possible. Repeat with the opposite hand on chest.
- Standing hands on knees anterior/posterior tilt – start with hands on knees (athletic position). Create anterior and posterior tilt with as little thoracic movement as possible.
- Standing single arm anterior/posterior tilt – start with one hand on a knee and the other on your chest (athletic position). Create anterior and posterior tilt with as little thoracic movement as possible. Repeat with opposite hand placement.
- Dead bug progression – start on back with knees and hips bent at 90 degrees (you should feel your entire spine connected to the ground – if not bend slightly more from the hips). Elevate arms so the wrists and elbows are directly above the shoulder (towards the sky). Extend one leg away without the spine coming off the ground (the pelvis will want to go anterior and lift the lumbar spine). Reset and repeat with the other leg.
Scapular Resistance
- J-band reverse fly’s – attach j-bands to both wrists. Start with anchor point facing the chest. Pull arms rearward by retracting the scapulas together. Maintain a neutral spine position. Hold at the retracted position for a 5 count and then return to the front (5 count coming forward as well – as the scapulas slowly move away from the spine and work off the rib cage.
- J-band bent arm pulls – attach j-bands to both wrists. Start with anchor point facing chest. Arms start bent at 90 degrees. Pull the elbows rearward as you retract the scapulas towards the spine. Maintain a neutral spine position. Return back to 90 degree position. Repeat as you change anchor point height and adjust posture accordingly.
- Single arm j-band arm pull – attach j-band to the back side wrist. Start with anchor point facing chest. Arm starts at 90 degrees. Pull elbow rearward while lead arm stays relaxed. Keep rib cage as stabile as possible. Return back to starting point. Repeat as you change anchor point and adjust posture accordingly.
- Single arm j-band body turn – attach j-band to the back side wrist. Hold arm at 90 degrees. Rotate body in the normal swing direction. Make sure the wrist doesn’t move as the scapula is retracted by the turn of the torso. Return back to starting point. Repeat as you change anchor point and adjust posture accordingly.
- Single arm, j-band back resisted turn – attach j-band to wrist. Anchor point will be off the side of the body (back shoulder). Start with arm at 90 degrees. Turn torso away from anchor while resisting wrist movement away from body (supination is fine). You may feel external shoulder rotation. Repeat as you change anchor point and adjust posture accordingly.
Swing Recommendations
- Deceleration
- Rotational medicine ball throws – start in stance with medicine ball around rear ribcage/abdomen. Stride and throw medicine ball with focus on staying in posture. Repeat from multiple hitting postures (different pitch heights) and different directionality (opposite field, center, pull side).
- Cross body medicine ball throws – start in a cross body stance (lead leg stride across the direction of the throw). Full speed throw trying to maintain feet spacing. Repeat to different postures (pitch heights) and directionality (opposite field, center, pull side)
- Rotational medicine ball throws with constraint – start in stance with medicine ball around the rear ribcage/abdomen. Stride and throw medicine ball with focus on staying in posture. Block lead leg from opening while thinking lead pocket should turn as little as possible. Repeat from multiple hitting postures (different pitch heights) and different directionality (opposite field, center, pull side).
- Cross stride start full swing – start with rear foot two feet behind front foot in normal launch position. No additional stride, slight counter turn and then swing. Try to maintain spacing between feet. Repeat to different postures (pitch heights) and directionality (opposite field, center, pull side).
- Normal stance cross stride full swing – start in normal stance, stride closed (about two feet). Full swing trying to maintain feet spacing. Repeat to different postures (pitch heights) and directionality (opposite field, center, pull side).
- No feet neutral stance full swing – start in neutral launch position. No additional stride, slight counter turn and then swing. Feet stay anchored throughout the swing (back foot may slide rearward but stay flat on ground). Repeat to different postures (pitch heights) and directionality (opposite field, center, pull side).
- Normal stance/stride no feet full swing – start in normal stance and take normal stride. Go right into swing without the feet coming off the ground (back foot may slide rearward, but stays on the ground). Repeat to different postures (pitch heights) and directionality (opposite field, center, pull side).
- Full swing limited hip turn – normal stance and stride. Normal swing trying to have the least amount of hip turn to get to full speed and best ball strike. Repeat to different postures (pitch heights) and directionality (opposite field, center, pull side).
- Full swing limited torso turn – normal stance and stride. Normal swing trying to have the least amount of torso turn needed to get to full speed and best ball strike. Repeat to different postures (pitch heights) and directionality (opposite field, center, pull side).
Rotational Acceleration
- PVC full swing (hear the most amount of wind off the PVC)
- PVC 180 degree swing – use a split grip on PVC (about two fist lengths). Create as much wind as possible while not going past 180 degrees of a turn. There will be rear elbow disconnect from the body line, but not across the belly button. Repeat from different postures (different pitch heights). Repeat to different layouts (opposite field, center, pull side).
- PVC 90 degree swing – use a split grip on the PVC (about two fist lengths). Create as much wind as possible without disconnecting rear elbow from rear hip. Repeat from different postures (different pitch heights). Repeat to different layouts (opposite field, center, pull side).
- Full bat swings (fastest bat speed)
- Bat 180 degrees swings on a tee – use split grip (about one fist length). Create as much much speed as possible without going past 180 degrees of a turn. There should be no wrist roll on the finish. There will be rear elbow disconnect from the rear hip (but not across belly button). Repeat from different postures (different pitch heights). Repeat to different layouts (opposite field, center, pull side).
- Bat 90 degree swings on a tee – use split grip (about one fist length). Create as much speed as possible without disconnecting rear elbow from rear hip. Repeat from different postures (different pitch heights). Repeat to different layouts (opposite field, center, pull side).
- Bat 180 degree swing on a flip or short overhand – use split grip (about one fist length). Create as much much speed as possible without going past 180 degrees of a turn. There should be no wrist roll on the finish. There will be rear elbow disconnect from the rear hip (but not across belly button). Repeat from different postures (different pitch heights). Repeat to different layouts (opposite field, center, pull side).
- Bat 90 degree swing on a flip or short overhand – use split grip (about one fist length). Create as much speed as possible without disconnecting rear elbow from rear hip. Repeat from different postures (different pitch heights). Repeat to different layouts (opposite field, center, pull side).
Throwing Force Plate Data
Kai gets into the front part of his foot early in his move forward. Being able to stay in the whole foot or even slightly heel centric will allow him to get more into the posterior side of his body. The result here shows him creating 107% of his bodyweight vertically in the rear leg. This spike is the knee beginning to go into early extension, as in the beginning of a jump. Being able to plateau that vertical force and carry it down the mound will make controlling the pelvis and rotating the pelvis easier. The vertical force on the lead leg also indicates an under rotated pelvis as there are three spikes in force. We are looking for two spikes, the third spike is seen when the lead leg is rotating out of the way so the pelvis can clear space for the torso. In the overhead medicine ball throw the lead leg vertical was high indicating that his force production and efficiency will continue to improve in his pitch as he is able to rotate the pelvis into landing.
Throwing KVest Data
Kai’s pelvis is under rotated at foot strike at 14 degrees. This under rotation puts his lead leg knee directed across his body. The knee being in the way blocks the pelvis and the pelvis in turn blocks the torso. To circumvent that Kai rotates his knee out of the way post landing. This is when the knee should be going into extension as it’s bracing up, but his is moving side to side at this moment. The pelvis doesn’t decelerate well as a result of this which will limit the speed gain to the torso.
 PRIVATE LESSONS
 CLASSES
 CAMPS
CAMPS ELITE TEAMS
 ELITE BASEBALL TV
 VIDEO ANALYSIS
 BIOTECH CAGE
 SHOWCASE