
![]()
Mobility Screen
Kelvin sets up with a neutral posture. He had a good range of motion arching his back, but showed vibration during anterior tilt. This indicates there is an imbalance between his lower back and abdominal muscles. This should be a primary focus on his functional strength plan. For example, implementing a dead bug variation and/ or superman series in his movement prep will help improve his range of motion. In turn, this will help with maintaining athletic posture in his swing. Kelvin was limited in the pelvic and torso disassociation screen but improved with assistance. This shows he needs to consistently work on separation of his lower and upper body.
Kelvin was limited in both squats by externally rotating his feet and not reaching desired depth. In his ankle screen, Kelvin was 4” short of expected range of motion. This will impact his ability to support his body throughout the swing. Ankle mobility exercises need to be highlighted in his weight room routine. However, with limited ankle mobility it will be challenging for Kelvin to maintain a back-leg load, forcing him to load quickly. Ideally, we want athletes to start the loading process slow and early. Kelvin’s hamstrings were within expectation as he was able to touch his toes without bending his knees.
During our thoracic mobility test, Kelvin actively turned 70 degrees to his right and 65 degrees to his left. He is on the looser end of thoracic mobility; this indicates it will take longer for Kelvin to take the slack out of his body. Kelvin created 50 degrees of thoracic side bend to both sides. This screen shows he is capable of having adequate side bend at contact. In the scapular retraction test he pulled rearward nearly 2.5 inches. This test shows he won’t need a big scap load. During the scapular palpation test, we were able get fingertips underneath his scapula. This indicates the muscle underneath his shoulder blade is underdeveloped. In order to maintain a scap load, Kelvin will have to strengthen this area. Scapular strength is delicate and should be consistently targeted in his workout routine.
Kelvin is considered “tight” in the lower quarter rotation test. He generated 30 degrees of left internal hip rotation and 20 degrees externally. He produced 25 degrees of right internal hip rotation and 25 externally. Kelvin was able to balance on his right leg for 6 seconds and 15 seconds on his left. Both ankles showed instability (shaking), which circles back to limited dorsiflexion. Ankle mobility needs to be targeted in the weight room in order for them to support his forward advance. Kelvin was limited in the glute bridge test and his core showed instability. Abdominals are the leading energy transfer in the body. We need to strengthen this area to efficiently transfer the energy to other areas of the body.
Kelvin had adequate range of motion externally in both shoulders. He was limited in the internal shoulder screen on both sides by several inches. This will impact his ability to pronate during the swing and throwing. Kelvin was within expectation in the, lat-length/ shoulder flexion test. During the reach, roll, and lift test, Kelvin was able to lift and hold both arms for the desired time frame. However, both arms showed signs of instability (shaking) and limited rotation. Once he stabilizes the muscles underneath his shoulder blade he will be able to control his load which will help with consistency. This circles back to getting fingers underneath his scapula. Again, this should be a primary focus in his routine. He passed all cervical, and wrists screens.
Force Plate Swings
Below is video of the swing analysis. I will walk you through this matched up with video.
Kelvin produced 96-99% BW into the ground and loaded into his toes. We would like to see him use the heel or whole foot. Loading into the toe causes back-leg force to significantly decrease as he advances forward; meaning he pushes away from the catcher and rather than pushing directly into the ground. Ideally, we would like to see him maintain BW as long as possible in his back leg. His front leg metric measured at 176% and he generated force very quickly. This metric shows Kelvin is forcefully landing his lead leg resulting in a quick energy transfer up the chain. He slightly strides across his body which will cause torque numbers to be high. On his back-leg Kelvin produced 60 Newtons and 244 on the front. His x-axis timing, a metric used for adjustability, is well lower than expectation at near 20%. Once Kelvin learns a heel or whole foot load, we will likely see this metric improve.
KVEST Sequencing & Rotational Speeds
The 3d readings are on kinematic sequencing and rotational speeds.
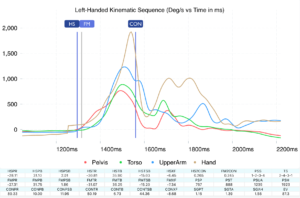
Kelvin demonstrated good swing sequencing for the majority of his swings. His hips, torso, lead arm and bat were all in order. However, at heel strike his torso was rotated inward at nearly 30 degrees. This will cause his hands to cast away from his body as he begins rotation resulting in “rolling over”. He needs to create an upper body load while limiting his torso rotation. This much inward turn will increase his time to impact. Once improved, his time to contact will be shortened and delay his swing decision. Kelvin will need to direct his focus to the opposite field until he learns a scap load. Hip speeds meet our expectation at 753 deg/sec while torso speeds are below average at 850 deg/sec. Additionally, the lead arm gains speed is good at 1240 deg/sec and the overall rotational speed is 1923 deg/sec. Kelvin will significantly benefit from our PVC progression.
Bat Sensor Data
Kelvin’s bat speeds are above average for his age, ranging from 66-68mph. His attack angles were higher than we prefer, ranging from 17-21 degrees. Ideally, we want this around 8-12 degrees. A steep upward attack angle will result in mishit balls and this is likely caused by inwardly rotating as he loads. His rotational acceleration numbers were within expectation at 10-15G’s”. His time to contact was average at 140-150ms. Vertical bat angle varies on pitch location; Kelvin’s were good, ranging from -25 to -35 in the middle of the zone.
Movement Prep
Based off screen and test results
Pelvic Tilt
- Sit-up position posterior tilt – start in sit-up position with your hand under your lower back. There will be a natural tilt of the pelvis into anterior position. From here begin the sit-up while trying to feel your lumbar spine press firmly into your hand. Once you feel this sensation you will return to original position. Next try to create the same sensation with out raising your shoulders or hips off the ground.
- Hands and knees anterior/posterior tilt – start on hands and knees (knees under hips). Create anterior and posterior tilt using as little thoracic movement as possible.
- Hands and knees single arm anterior/posterior tilt – start on hands and knees (knees under hips) and bring one hand to your chest. Create anterior and posterior tilt using as little thoracic movement as possible. Repeat with the opposite hand on chest.
- Standing hands on knees anterior/posterior tilt – start with hands on knees (athletic position). Create anterior and posterior tilt with as little thoracic movement as possible.
- Standing single arm anterior/posterior tilt – start with one hand on a knee and the other on your chest (athletic position). Create anterior and posterior tilt with as little thoracic movement as possible. Repeat with opposite hand placement.
- Dead bug progression – start on back with knees and hips bent at 90 degrees (you should feel your entire spine connected to the ground – if not bend slightly more from the hips). Elevate arms so the wrists and elbows are directly above the shoulder (towards the sky). Extend one leg away without the spine coming off the ground (the pelvis will want to go anterior and lift the lumbar spine). Reset and repeat with the other leg. There are many variations available to add after complete mastery of this movement.
Disassociation
- Rack or Open doorway assisted pelvic disassociation – place hands/forearms against anchored frame (keep shoulder line inside of frame). Rotate pelvis/hips w/out moving shoulders.
- Partner assisted pelvic disassociation – have a partner support your shoulders. Rotate pelvis/hips w/out moving shoulders. Repeat from multiple postures (from high pitch to low pitch).
- Partner assisted counter turn pelvic disassociation – have a partner turn your shoulders into counter rotation. Resist the rotation and rotate pelvis/hips while resisting the counter turn. Repeat from multiple postures.
- Self resisted pelvic disassociation – start with a PVC on the shoulders for reference. Keep the PVC stabile while rotating pelvis/hips. Repeat from multiple postures.
- Single leg 90 degrees internal hop pelvic disassociation – Start on back leg with front leg elevated. Hop on back foot, while in the air rotate the leg/foot 90 degrees internally, then land. Hop again and return the back leg/foot to initial starting position. Use PVC on shoulders for reference.
- Banded hip & wrist pelvic disassociation – Attach band to rear hip (belted) and j-band to rear wrist. Have anchor points facing the chest direction. Go from stance to counter move and advance. Rotate pelvis/hips while maintaining scapular resistance (j-band tension). Repeat from multiple postures.
Rotary Instability – Anti-Rotation/Deceleration
- Push-up position single shoulder touches – start in push-up position, use one hand to touch opposite shoulder. Make sure spine stays flat in a neutral position. Repeat with the opposite hand.
- Push up position since arm pull throughs – start in push up position with a weight just outside body frame (even with rib cage). Grab the weight with the opposite hand and pull under the body to the opposite side. Keep spine flat and neutral (can put a ball or PVC on back to ensure no movement). Repeat pulling back the opposite direction.
- Standing sideways band resisted isometric holds – start with band anchored off to the side of the body. Take bands and hold them even with the chest, press away from chest, hold for 15 seconds. You can vary resistance of bands and add band interference as needed. Repeat opposite direction. Repeat from multiple postures.
- Standing offset band resisted isometric holds – start with band anchored off to the side of the body. Disassociate the torso at least 30 degrees from the pelvis/hips. Hold bands even with the chest, press away from chest, hold for 15 seconds. You can vary resistance and add band interference as needed. Repeat opposite direction.
- Standing eccentric/concentric band resisted turns – start with band anchored off to the side of the body. Hold band even with the chest, press away from chest, rotate away from anchor point (quickly), return back to center (slowly – 10 count). Repeat opposite direction. Repeat from multiple postures (ball heights).
- Partner assisted counter move resistance – start from launch position. Have partner rotate shoulders in the counter turn direction, resist the turn (5 second holds). Repeat from multiple postures.
- Partner assisted finish resistance – start at the follow through portion of the swing. Have partner rotate shoulders in the direction of the finish, resist the turn (5 second holds). Repeat from multiple finishing postures.
- Counter turn medicine ball catches – start in counter turn position. Have a partner throw a medicine ball off the backside of the counter turn position. Catch the ball and stabilize without continuing into counter turn. The ball weight, speed, or distance away from the body can be adjusted as needed. Repeat in multiple postures.
- Swing finish medicine ball catches – start at finish of swing. Have a partner throw a medicine ball off your finish side, catch and stabilize the ball without continuing further into finish. The ball weight, speed, and distance away from the body can be adjusted as needed. Repeat in multiple finishing postures.
- Counter turn medicine ball catch and throw – start in stance, catch ball going into counter turn, and throw back in swing posture. Throw from multiple swing postures and throw in different direction of follow through (opposite field, center field, pull side). Hold finish in the direction of the throw for deceleration work.
- Finish medicine ball catch and throw – start at finish of swing, catch ball going into the finish of the swing and reverse the throw back. Throw from multiple swing postures, trying to stabilize after the throw as well.
- PVC check progression
13. Speed Slugger forward and backward swing (full intent)
Swing Prep
X-Axis Timing (heel pressure)
- One leg kettlebell squat w/slide disc – start on back foot with kettle bell front racked. Front foot will have a slide disc under it. Squat with normal pattern with emphasis on feeling heel centric load, while allowing lead foot to slide out.
- One leg kettlebell jump squat – start on back foot with kettle bell front racked. Squat with normal pattern and then jump off the ground. Stabilize with a soft landing as you go back into squatting position. Feel the heel impact and create pressure against the ground.
- Back foot disc anchors – start with a disc under the ball of the foot of the rear shoe. Heel of the rear shoe should be anchored to the ground. Stride away from the back foot while keeping it anchored in the ground.
- Both feet disc anchors – start with both balls of feet on the slide disc. The heel of both feet should be off the discs. Stride forward by sliding the lead slide disc forward (you should be on the ball of foot only. The rear shoe will stay anchored in the heel and the lead side will slide free. As you get to end of stride length begin to turn the pelvis/hips. The lead foot should now anchor the heel which will stop the slide forward. Back side will likely spin or kickback off of disc.
- No feet neutral stance full swing – start in neutral launch position. No additional stride, slight counter turn and then swing. Feet stay anchored throughout the swing (back foot may slide rearward but stay flat on ground). Repeat to different postures (pitch heights) and directionality (opposite field, center, pull side).
- Normal stance/stride no feet full swing – start in normal stance and take normal stride. Go right into swing without the feet coming off the ground (back foot may slide rearward, but stays on the ground). Repeat to different postures (pitch heights) and directionality (opposite field, center, pull side).
- Banded resistance swings – banded resistance to the lead hip (belt). Normal swings with thought of resisting the band from pulling you forward in the turn. Band resistance can be altered as necessary. Repeat to different postures (pitch heights) and directionality (opposite field, center, pull side).
Time To Impact
- PVC full swing (hear the most amount of wind off the PVC)
- PVC 180 degree swing – use a split grip on PVC (about two fist lengths). Create as much wind as possible while not going past 180 degrees of a turn. There will be rear elbow disconnect from the body line, but not across the belly button. Repeat from different postures (different pitch heights). Repeat to different layouts (opposite field, center, pull side).
- PVC 90 degree swing – use a split grip on the PVC (about two fist lengths). Create as much wind as possible without disconnecting rear elbow from rear hip. Repeat from different postures (different pitch heights). Repeat to different layouts (opposite field, center, pull side).
- Full bat swings (fastest bat speed)
- Bat 180 degrees swings on a tee – use split grip (about one fist length). Create as much much speed as possible without going past 180 degrees of a turn. There should be no wrist roll on the finish. There will be rear elbow disconnect from the rear hip (but not across belly button). Repeat from different postures (different pitch heights). Repeat to different layouts (opposite field, center, pull side).
- Bat 90 degree swings on a tee – use split grip (about one fist length). Create as much speed as possible without disconnecting rear elbow from rear hip. Repeat from different postures (different pitch heights). Repeat to different layouts (opposite field, center, pull side).
- Bat 180 degree swing on a flip or short overhand – use split grip (about one fist length). Create as much much speed as possible without going past 180 degrees of a turn. There should be no wrist roll on the finish. There will be rear elbow disconnect from the rear hip (but not across belly button). Repeat from different postures (different pitch heights). Repeat to different layouts (opposite field, center, pull side).
- Bat 90 degree swing on a flip or short overhand – use split grip (about one fist length). Create as much speed as possible without disconnecting rear elbow from rear hip. Repeat from different postures (different pitch heights). Repeat to different layouts (opposite field, center, pull side).
 PRIVATE LESSONS
 CLASSES
 CAMPS
CAMPS ELITE TEAMS
 ELITE BASEBALL TV
 VIDEO ANALYSIS
 BIOTECH CAGE
 SHOWCASE